Like Tweet +1
HHH banner
April 24, 2019

martin s wheel hoe

The ultimate goal of farming is not the growing of crops, but the cultivation and perfection of human beings. - Masanobu Fukuoka, The One-Straw Revolution

***

Harvest Haven Certified

Fresh strawberry season will be here in a couple of months. While you're waiting, enjoy frozen Harvest Haven strawberries. The best! Here's why they are.

Conventional
Don't buy conventional strawberries. They're horrid. They taste like soured cardboard and are saturated in an unprecedented and unregulated concoction of harmful chemicals. They're a lab experiment gone really bad.

Certified Organic
Don't buy conventionally-grown certified organic strawberries, either. They're grown in fields of plastic weed barriers that suffocate the soil and heat up the roots for maximum production and minimal flavour. They're picked under-ripe. Fruit that's picked under-ripe has never reached peak sugar content. Fruit that doesn't reach maximum sugar content is seldom targeted by fungus or pests. Plants that don't have to respond to stress don't create polyphenols (i.e. antioxidants) to defend themselves.

In other words, the organic strawberries you thought were loaded with antioxidants are just the empty shell of what they should be. They're not just void of flavour, they're void of nourishment potential, as well. The organic strawberry might not be toxic, but you're definitely not getting what you're paying for.

Harvest Haven Certified
Harvest Haven certified strawberries are the real thing. Grown in an actual field of straw. They're picked when ripe. The roots of the plants are cool and well oxygenated while remaining consistently moist. This maximizes both the flavour and the nutrient density of the fruit. Our frozen berries are amazing and carry the healing goodness of the summer sun into the winter when you need it most.

In short, my sales pitch is simple, and call it elitist or egotistical if you must, but my recommendation is to eat only Harvest Haven strawberries. And eat as many as you can! As soon as possible, or better still, even sooner! -
Martin

***

Closed Mondays for Farming and Construction

We're down to the wire now. The new store opens Sunday, May 12, so we're getting ready for you.

That includes uncovering the strawberry plants. We gotta have them ready too.

unstrawing the field
***

Important Notice

We're going to be CLOSED from Saturday, May 4 until Saturday, May 11 for moving.

OUR NEW STORE IS OPENING SUNDAY, MAY 12 AT 10:00 AM.

Stock up on your groceries by Friday, May 3; otherwise, if you show up during the week we're closed, you will be recruited to help us move. You have fair warning.

opening
***

On Sale...

T-Bone Steak- Sale $18.99/lb Reg. $19.99/lb

Lamb Stew- Sale $10.49/lb Reg. $10.99/lb (See Recipe Box)

Beef Wieners- Sale $9.99/lb Reg. $10.99/lb

Chicken Drumsticks- Sale $5.79/lb Reg. $6.99/lb

Shallots- Sale $3.99/lb Reg. $4.99/lb (See Recipe Box)

Frozen Strawberries- Sale 3 or more bags at $6.99/lb Reg. $8.49/lb (See Recipe Box)

Baking Powder -Sale $7.49 Reg. $8.49 (See Recipe Box)

Field Day Organic Maple Leaf Cookies -Sale $5.99 Reg. $6.99 (See Recipe Box)

***

The Recipe Box

Please note, all ingredients in our recipes are organic.

lamb stew with dumplings

Lamb Stew with Rosemary Dumplings

Stew
3 lb.Harvest Haven Lamb Stew meat
2 tbsp flour
Salt and pepper to taste
Dash of cayenne pepper
2 tbsp olive oil
2 Harvest Haven cooking onions, chopped
3 Harvest Haven shallots, chopped
2 tbsp tomato paste
Pinch of sugar
1/2 cup water
2 cups dry red wine or Harvest Haven Lamb bone broth
3 large Harvest Haven carrots, cut into 1"pieces
1/2 cup frozen peas

Dumplings
1 1/2 cups flour
2 tsp baking powder
1/2 tsp salt
cracked pepper to taste
1/2 tsp dried rosemary, minced well
3 tbsp butter
3/4 cup water, approx.

Mix flour with salt, pepper and cayenne, toss with lamb, and pat off excess.

In a large pot, heat olive oil over high heat, then toss in cubes of meat, turning them every so often so that they are well browned. Make sure not to crowd the pot. You'll likely have to sear the cubes in a couple of batches. Once all the meat is browned, return all meat to pot, reduce heat to medium and add chopped onions and shallots, and let sweat with the meat for several minutes. Add tomato paste and sugar, and stir in the water, scraping off the browned bits from the bottom of the pan. Cook for 5 minutes, then add wine or bone broth, stir, and bring to a boil. Taste for seasoning, adding more salt, pepper and sugar if needed.

Reduce heat to a low simmer, cover the pot and let stew cook for 2 hours, stirring about every 20 minutes. After 2 hours, toss in carrots and frozen peas, and cook for 10 minutes. If the stew gets a little dry at any point, add a bit more water.

Meanwhile, make the dumplings. In a bowl, mix together the flour, baking powder, salt, pepper and rosemary. Add the shortening, mixing it in with a fork so it breaks down and the mixture looks grainy. Slowly add the water until dough is light but solid and can be easily dropped from a soup spoon.

Remove the pot lid and stir. Wet a soup spoon and scoop up mounds of dumpling dough, and drop into stew. Space dumplings out around the perimeter first, then working your way in. Do not stir! Cover pot allow dumplings to cook for 20 minutes.

Serve immediately.

***
shallot tart

Shallot Tart

500g Harvest Haven shallots
2 tbsp olive oil
25g butter
2 tbsp balsamic vinegar
1 tbsp fresh thyme or 2 tsp dried thyme
300g puff pastry, defrosted if frozen
100g grated cheddar or emmental

Put the shallots in a large bowl and pour over boiling water to cover. Leave for 5 mins, then drain and peel. Cut the shallots in half (some will naturally break into two sections).

Heat the oil and butter in a frying pan, add the shallots and fry gently for 10 mins, until they are softened and lightly browned. Stir in the vinegar, thyme and 1 tbsp water, then cook for a further 5 mins, stirring occasionally. Remove from the heat and tip into a non-stick shallow cake or pie tin, about 20cm across. Leave to cool.

Heat oven to 200C/fan 180C/gas 6. Cut the pastry into two. Roll out each piece to about 5cm larger than the top of the cake tin. Put one piece of pastry over the shallots. Sprinkle evenly with cheese and cover with the second piece. Trim the edges of the pastry to a little larger than the tin, then tuck the edges of the pastry down the sides of the tin.

Bake for 25-30 mins, until pastry is crisp and golden. Leave to cool in tin for 5 mins, turn out onto a flat plate, cut into wedges and serve warm.

***
Strawberry-Cheesecake-Recipe

No-Bake Strawberry Maple Cheesecake

For the crust
2 cups Organic Field Day Maple Leaf Cookie crumbs
1/4 cup granulated sugar
6 tablespoons unsalted butter, melted

For the cheese cake
1 (8 ounce) package cream cheese, softened
1/3 cup white sugar
1.5 cups heavy whipping cream, whipped

Glaze
1 cup thawed Harvest Haven strawberries
2 1/2 cups powdered sugar

Combine ingredients for crust and press into 9" spring form pan and refrigerate for 30 minutes.

Beat cream cheese and sugar until smooth.

Fold in whipped cream.

Spoon mixture into cookie crust.

Refrigerate for 2 hours.

Meanwhile, puree the strawberries in a blender or small food processor.

Place the powdered sugar in a medium bowl. Pour in the strawberry puree and whisk until smooth. Top the cooled cheesecake with the strawberry glaze.

Refrigerate for an hour before using over cheesecake.

***

Down on the Farm

My Chicken Farm

"Hey, Mathijs! I have a thing, too!" exclaimed Marseilles, excitedly running through the house to find her brother.

"Konstantijn has her sheep, you have your mechanics, and now, I have chicks. Daddy said I could raise chicks from eggs.

"We're going to build an incubator and I can keep it in my room."

This energetic little farm girl promptly started clicking keys on her computer, searching for everything she could find about raising chicks in an incubator. She was on a mission!

Mathijs was not so impressed with this new adventure until Marseilles mentioned building the incubator using an insulated box and lights. Now, he was engaged.

Here's Marseilles' description of how to hatch chicks. (Note: It's published here just the way she wrote it. Remember, she is only eight.)

I am Marseilles and I decided to hatch chicks (I have to tell you it is not that easy).

PART ONE: How I decided to hatch eggs. This is how I decided to hatch chicks: my dad said, "Hey, want to hatch chicks?" I thought this was just a joke, not really when he asked me again. "Hey, want to hatch chicks?" I said yes, so he told me what I needed, he told me about incubators, and he would help me after the store construction was done. (See, Closed Mondays for Construction.) But he did it earlier instead.

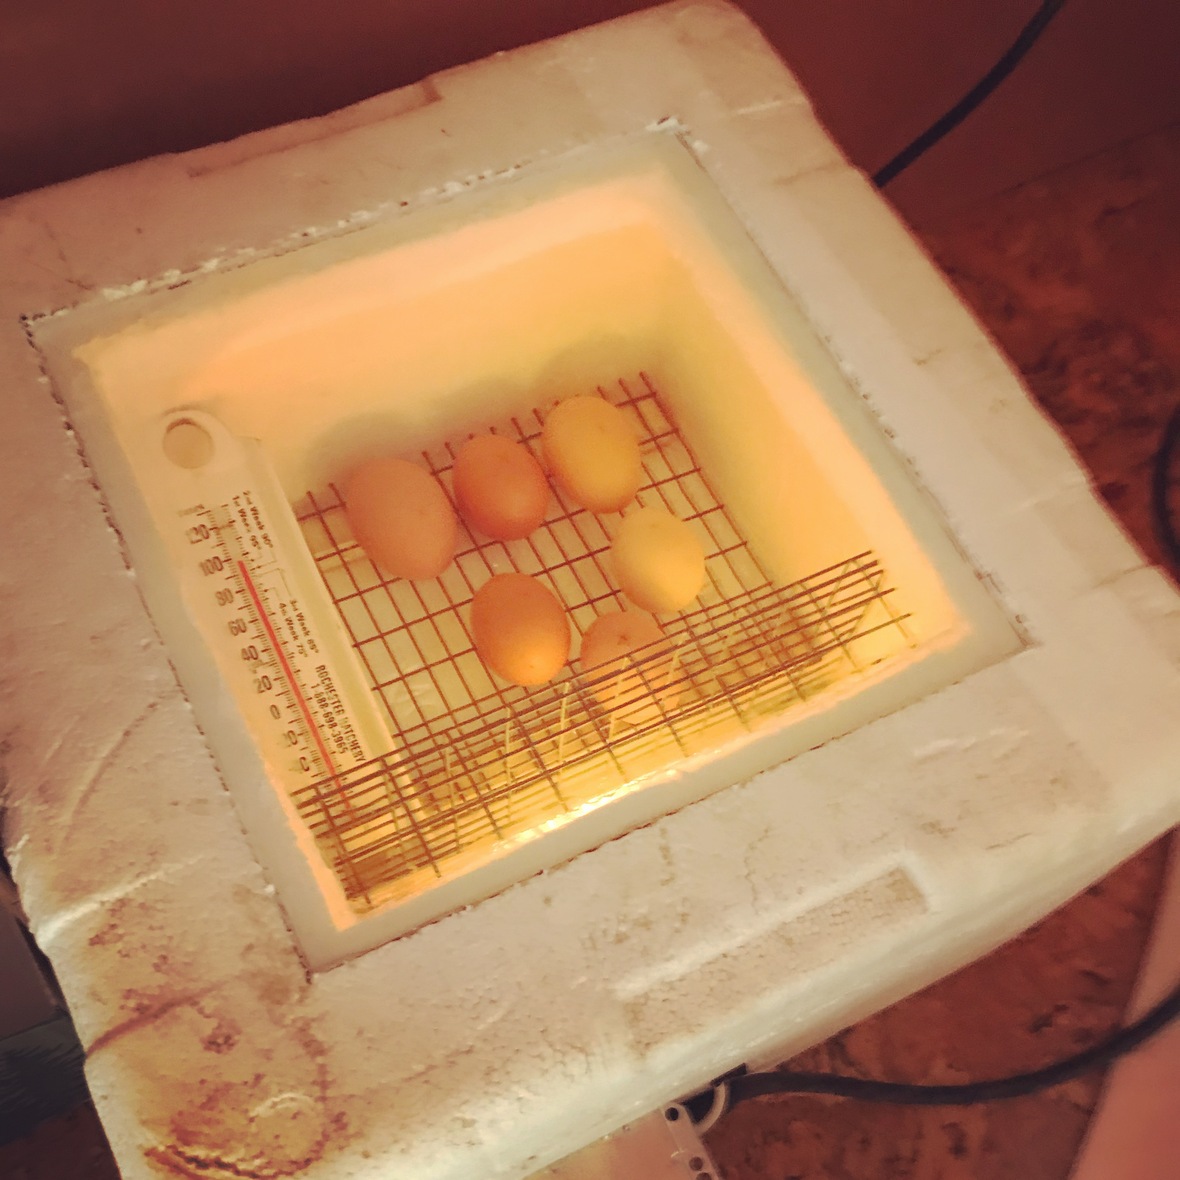
PART TWO: Incubators. I have an incubator made of Styrofoam. It has a wire screen to protect the eggs from the heat and has a jar of water to soak up the heat because the heat gets too hot. You will need to get rid of some of the heat before they turn into a bunch of little fried eggs in the inside. The water also helps to keep the humidity at a good level.

PART THREE: Flipping the eggs. You need to turn the eggs over every morning, afternoon, and evening. You mark the eggs because you might forget you flipped them and flip them again and they get too hot.

PART FOUR: Marking the eggs. Use pencil or pen for this and mark them by drawing an "X" on one side and an "O" on the other side.

PART FIVE: The "water bowl trick." I don't know how much grain I need yet, I don't know how many eggs are going to live, and I don't know if any are even fertilized. But there is a thing I like to call a "water bowl trick" that is when you put your eggs in a bowl of warm water and these are how to tell if they are alive. If it sinks to the bottom, there is no chick in it nor will it grow. Keep it away from the other eggs. If it goes up to the top, and half or more sticks out, the embryo didn't make it and won't hatch. Keep it away from the other eggs as well. If it floats with only a little bit sticking out, it might move around a little, and it might be still. Carefully fish the egg out and put it back into the incubator or under the hen. Hatching an egg takes 21 days.

PART SIX: Temperature and humidity. The temperature should be 97F to 101F and if it drops suddenly, it could kill the chicks or could make hatching time longer than 21 days. My temperature dropped when I started so we'll see what happens.

PART SEVEN: A book that helped. Of course, I'm only eight years old, and I found a book called, "Unusual chickens for the exceptional poultry farmer." And I found a sequel of the book called, "Are you ready to hatch an unusual chicken?" It tells you about what temperature you need for the eggs, the "water bowl trick," and it has how to deal with new chickens that you bought, and the stages of a chick inside its shell. I found this book useful, and if you would need help for hatching chicks, I bet that this will help you.

This morning, I thought that an egg was broken, until I heard a "Cheep! cheep!"

***

Powered by Mad Mimi®A GoDaddy® company